|
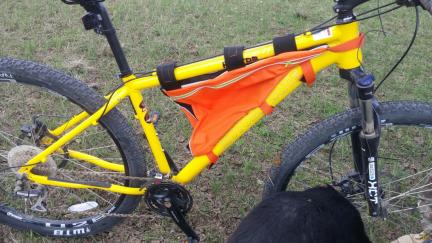
Bicycle Frame Bags ~ Make Your Own
BikePacking, Bike Touring, Bicycle Camping, basically all the same. You go out on your bicycle for a long ride, a ride where you will stay out overnight or for several days to months. You will need a way to carry your camping gear with you on your bicycle.
Here are some ideas and information as well as patterns for making your own gear (MYOG) for this project, a Bicycle Frame Bag for ANY Bike Frame. (photos coming)
Check my Bicycle Blog Page for more information on making Bicycle Panniers, Saddle Bags/Saddlebags, Handle Bar/Handlebar Bags for kids as well as other types of patterns and ideas for making your own fun bicycle bag gear. I have, on other pages of www.doesmybuttlookbiginthesaddle.com as well as www.faroutliving.com, also included ideas and information for taking a Stuffed Animal and converting it into a Bicycle Bag for cuteness factor on the trail, and or to encourage a child to spend the night in a tent on the trail. Using the Stuffed Animal to carry items in, means not having it in the way, and or taking up room IN your bags on the way to camp, but your child will still have their favorite/special Stuffed Animal with them at bedtime.
I am not sure who came up with the Brilliant/Genius Idea of the Frame Bag for Bicycles, but it caught on like FIRE! You don't even have to be a master at the Sewing Machine to make one for your own bike. I have even seen them make with Cardboard and Correlated Cardboard with tape to hold them shut. Sewing one, with patients, will give you extra pride too...not to mention the money you will save making your own equipment.
Making your own gear also means choosing your own colors. I would highly recommend that a thicker Waterproof Fabric be used to make these so that they hold up over time....as well as while you are on rough trails.
much more to come.....
Before you start this project decide what it is you are going to want. Decide how you want your Frame Bag to look, how you want the holders/velcro to sit on your bicycle frame, how you want your zipper, what colors, how you want this project to turn out in the end. Don't hurry this project.
Take your time making your Pattern. Measure and remeasure your pattern and frame before cutting your fabrics. Many people cut out cardboard, holding the cardboard up to their bicycles to make the pattern, then make a complete cardboard cut out, placing it inside their bike frames, for sizing and to make their patterns for the Frame Bags. This way you will know for sure it will fit your bike. HOWEVER! DO NOT FORGET TO ADD ABOUT 1/2" MORE TO YOUR PATTERN, SO THAT YOU HAVE SEAM ALLOWANCE ON YOUR FABRICS WHEN SEWING.
Buy all your notions, that is supplies, before starting your project. Plan a trip to the Fabric Store on a day when you can take your time and look and learn before starting your project. You might be surprised at just how helpful the employees can be.
Be sure to take your time making your Pattern. Look at your Pattern on your bicycle then walk away, do something else, come back and look at it all again. Make sure it will all work out the way you have pictured it in your mind before you start the project.
REMEMBER! REMEMBER! REMEMBER! "MEASURE TWICE, CUT ONCE"!
Unless you have a friend or know someone with a bicycle that is the same model, year, and size of your own bike, you will need to measure and make your own pattern for your Frame Bag. All frames are a bit different. Some are similar enough to share patterns, but I will warn you, HOLD THE PATTERN TO YOUR BICYCLE BEFORE CUTTING YOUR PATTERNS COMPLETELY OUT, and don't forget seam allowances (pattern needs to be about 1/2 bigger so that when you sew your fabrics together then size is correct for your Frame Bag.
I have seen ALL KINDS of Frame Bags cut around Springs, Water Bottle Cages, into Women's Bikes, it is all in the pattern and what you are willing to work with. Some Frame Bags look like a set of stairs, and when placed onto or into the Bike Frame, look great and work well. Every little bit of space to carry items in your Bicycle Frame helps when out for overnighters.
much more to come....
When you start making your Pattern for your Bicycle Frame or FROM your Bicycle Frame, bring your brain and take your time.
I HIGHLY RECOMMEND THAT YOU DO NOT CUT YOUR FABRIC THE SAME DAY AS YOU MAKE YOUR PATTERN FOR YOUR FRAME BAG. Take your time. This is not Rocket Science, but with the cost of Fabrics and other supplies it takes to make this type of Bag, YOU do not want to finish sewing your project only to say "OH! I SHOULD HAVE THOUGHT OF THAT!", as so many people do.
You need to remember that WHEN you make your Pattern from you bicycle frame, you need to add 1/2" all the way around your pattern to the size, so that you have "seam allowance", that is, when you sew, you use up parts for the fabric, it takes some of your sizing.
For me, the best way to make a Pattern for a Frame Bag for a bicycle is to use a piece of clean cardboard, held up next to the bike, and drawn. Do NOT use a permanent marker. If you use a permanent marker and mark on your Bicycle Frame, you will not be able to get that mark off. Use a pencil or ballpoint ink pen. Pencil is best.
After I make my cardboard Pattern, I make sure, after cutting it out, that it fits the frame well. If not, use that piece of cardboard to tweak your next piece. After you have the right pattern with cardboard. You can use that to cut your fabric, ADDING 1/2" ALL THE WAY AROUND THE PATTERN FOR FABRIC SEWING ALLOWANCE. I cut a large Feed Bag, the inside lining of Dog Food Bags, to make a real Pattern. A nice thick paper Pattern I will have for years to come. I write on the paper pattern the name of what pattern it is, any sewing notes, and usually the date I made the first. This way if you want to make another, tweaking it after use of the first on the trail, or if a friend asks you to make them one, or if you would like to have one in another color (like Bright Orange for Hunting Season), your pattern is already made and ready.
more to come.....
Choosing Your Fabrics and or Stiffeners Choosing you fabrics is part of the fun! I do HIGHLY recommend a Cordura Fabric. However, you could use any fabrics you like, as long as you have a liner that will give the Frame Bag some stability and hold it to shape as you ride your bicycle on the trail with it full of your gear for the trip.
Some fabrics might even need a stabilizer to stuff between fabrics, the outside fabric and the liner, to give it more shape. If your Frame Bag is especially large you might want to think about this. Some folks have used Plastic Canvas, that stuff that can be found in the Craft Dept or Craft Stores that is made up of plastic squares. Other people use the firm plastic cutting boards that are thinner and roll up, cut to size. Still others use Yoga Mats of different thicknesses. Remember, the thinner with stability the better. You do not want the space you have taken up with fat thickeners.
Make a list of the supplies you will need for the Frame Bag you are crafting and check it twice:
Sewing Machine, Scissors, Measuring Tape, (seam ripper),
Fabric = How much?
Thread in an All Purpose Type, the Color you want
Stiffeners if you need them for the type of Fabric you choose
Zipper
Velcro
Webbing - if you are going to use it for stiffening or to back your velcro strips
You sure might want to buy some less expensive fabric and make a Prototype of your Frame Bag before you make your actual bag. These are not as easy to make as they look. The pattern needs to be correct, your seam allowances need to be correct, your zipper and velcro placement need to be not only correct, but turned the correct way before sewing....
more to come....
Believe it or not, the zipper IS a Big Deal. The type you choose, the size you choose, the Color you choose will matter when your Frame Bag is finished and you are out and about using it.
Before you go shopping for you Zipper think about how you want it to look on your frame bag. Do you want the color to match? Stand out? Do you want Plastic? Do you want a zipper that unzips from both sides? What about a Zipper with Reflective Strips on either side of it?
No matter what you want....Buy a thick, big teethed, well made zipper. Never buy a cheap Zipper if you want it to perform well and last in your Frame Bag. A cheap Zipper will break and you will have to replace it. Replacing it, is not an easy task.
You will also have to decide if you are going to sew a Rain Flap over your zipper and cut your Frame Bag Pattern accordingly.
Don't forget to allow fabric allowances around the area when you sew your Zipper into your fabric. Play with your Pattern before cutting your fabric, especially around your zipper.
When you go shopping for your supplies, TAKE YOUR TIME READING AND ASKING QUESTIONS SO THAT YOU BUY THE CORRECT ITEMS YOU WILL NEED FOR A LONG LASTING, GOOD LOOKING, FRAME BAG.
more to come
Some people really get hung up on the "right" sewing machine. The truth is, ANY well working Sewing Machine will work. But, choose the right needles. You will need a Heavy Duty Sewing Machine Needle made for the exact Sewing Machine you are using.
An "All Purpose" Thread will be your best choice for Thread. You want to choose a color that matches or is just a little bit lighter in color than your fabric. If you are using a Patterned Fabric, use the color thread that is the background color of your Print Fabric.
"Measure Twice, Cut Once" Check your pattern and make sure you fully understand how the pieces you cut out of your fabrics will need to be cut and sewn together BEFORE you cut the fabric.
Before you make your pattern for the Front, or the side that will host the Zipper, decide if you want a Rain Flap over your Zipper. If you are using a Reflective Colored Zipper, then do not use a Rain Flap. If you bought or are buying a metal Zipper, you will need a Rain Flap. For a strong Plastic Zipper, decide if you want the Zipper exposed before cutting your Fabric.
The "Gusset" is the piece that goes around the front and back of the Frame Bag to give it width. The Gusset is what holds the front and the back pieces together. Many people cut several pieces of fabric then sew them together at the corners of the front and back of the Frame Bag..... Why? Your seams are the areas will make those areas weak. If you cut one long piece of fabric, a bit longer than you think you will need, leaving enough to sew together at one seam, you will have a stronger piece of equipment when in use.
more to come...
Attaching the Velcro Closures BUY GOOD VELCRO FASTENING. There is the Good Stuff and the Cheap Stuff. I promise you, the cheap stuff will not last long on your Frame Bag.
Decide if you will be using the 1" (and it is less than 1" when you measure it) or the 2" size. Decide on your color choices. Decide if you will cover the back of the velcro with your fabric or webbing before attaching it to your Frame Bag.
How much will you need for the type of Frame Bag you will be making?
You can buy the good stuff or the cheap stuff in Fabric Stores or in Discount Stores Fabric Depts. If you are on a budget, double the cheap stuff side by side.
Ok, your pieces are all cut out, your sewing machine is all set up and ready to go. You are ready to put it all together and get out on the trail using it!
Mark you areas on the fabric where you will insert your velcro. Be SURE that you know which way to sew the velcro into the Frame Bag Seams. Check and recheck
Your Frame Bag will only be as strong as your seams. I suggest you use one seam around your Frame Bag, try it on your bicycle, then go back to the sewing machine and add more seams. This way, if you made mistakes as you sewed your Frame Bag together, you will be able to easily take the seam apart and fix it.
You will want to triple your seams when you sew your finished project. I recommend a double stitch all around the bag. Everywhere there is a seam, double it by sewing one seam, or row of stitches, over the other, then, sew another, one or two, seam(s) just to the outside of the double seams. Just a little over on the same area of the fabric you are sewing. What you are doing is strengthening your seams, without perforating your fabric.
VELCRO FASTENERS:
Details! Make sure you sew all of your Velcro Fasteners to match up to the other side of your Frame Bag. Your Velcro Fasteners need to be long enough to fold over by at least 1/2" of your Bicycle Frame. But you do not want the Velcro too long. Better to error on the long side than too short to hold the bag securely to the bike frame. You can always cut the extra off after they Frame Bag is finished and put onto the bicycle.
Details! Sew all the same sides of Velcro to the same side of the bag, all the way around. Make sure all of the Hard Side is such that it sits on the bike frame with the soft side of the velcro being the side folded down unto the bike. Why does it matter? If the hard side comes down over the bike frame and it is not fastened down just right, the hard side of the velcro will/could scratch your bicycle frame. It also looks nicer when all the pieces are lined up and the same.
Tip: If you sew your velcro first onto fabric, leaving the fabric just a tad/bit/smidge larger than the velcro piece, this will keep the velcro from scratching your bicycle frame.
Makes sure you have several lines of stitches over your velcro. Where the velcro attaches to your Frame Bag are the "areas of stress". However, DO NOT sew the same area back and fourth. Doing that will perforate your Velcro and it will split at that area and break apart at the worse time for you.
ZIPPER:
Details! Your stitches around your Zipper are the stitches that people will see. Take your time and keep the area clean and straight.
more to come....
If your bicycle, like my Woman's Bike, does not have a top bar, as Men's Bikes do, but you still would like to have a large nice Frame Bag, all is not lost. You can add "Sling Tabs" (think shoe/boot lace holes), and lace cord or elastic through, tying off to your Seat Post and your Handlebar Post. Your Frame Bag should have stiffeners added to the sided so that the Frame Bag with have more upright stability, than a Frame Bag that has a top bar to attach to.
How many Sling Tabs? It depends on the size of the bicycle. However, you need many, but not too many. You want the cord to have structure, but not be so much Xed that it is to curved to hold the bag up securely.
more to come....
Adding Reflective Strips To Your Frame Bag There are different ways to add Reflective Strips to your Frame Bag. You will be able to purchase Reflective Patches, Strips in many different sizes, or Reflective Piping. What is Piping....it is a trim that sews into the seams as you sew your Frame Bag (or other bags) together. I suggest two things.....USE REFLECTIVE STRIPS AND PIPING ON YOUR BAG. And SEW IT. Just ironing it onto the types of fabrics used for Bicycle Bags can be tricky and most will come off...especially in the cold. I found this out when I made our Poggies.
You might say that you do not ride in the dark. Doesn't matter. Reflectivity can be picked up in the Sun Light during daytime hours. And. You never know when you might still be out there on your bicycle after the Sun goes down...BE SAFE! Reflective Strips are not that expensive.
more coming soon ~ page still under construction, photos coming!
Rain Proofing Your Frame Bag Even when using "water resistant" or "water proof" fabrics, I still spray items with the spray can Waterproofing used for Tents and Camping Gear. I hang my items from an outdoor clothes line, or set cardboard, or in a cardboard box to spray them. I wear rubber gloves when I spray, and I spray them twice, 24 hours apart. Then I let the items (boots, bags, leather, whatever) sit for another 24 hours. I find this to work VERY well and I get longer use out of the items in the long run. The spray is NOT expensive and only takes a couple of days before I can use the item....for years to come and trust that the items inside do not become wet when in use.
Cleaning Your Frame Bag After Riding on Trails Frame Bags can get dirty on the Trails. Cleaning them might be easier than you might think. If your bag is just a bit dirty, use a DAMP, no wet, wash cloth and wipe it down. If your bag got filthy will out on a muddy trail, put it into your kitchen sink and give it a good washing using shampoo for your soap. After that, if the bag is still not really clean, wash it in the washing machine with a load of bath towels, and wash on COLD! Be sure to attach all of the velcro, front to backs, before washing in the Washing Machine. HANG TO DRY. OR LAY FLAT ON A COUPLE OF DRY BATH TOWELS TO DRY. NEVER PLACE YOUR FRAME BAG IN THE MACHINE DRIER AND EXPECT TO USE IT AGAIN.
You might want to spray your Frame Bag again with Waterproofing after washing it. Let stand another 24 hours before use.
Make Sure You Take A LOT Of Photos! Years ago I was Blessed to Ride Katy Trail, Rails to Trails, in Missouri, with my, then, 18 year old son, and a Church Group. I took a few photos. They were all ruined in Black Mold we did not know we had when we lived in Northern Wisconsin. I am heart broken that I do not have one photo of any of it. Not even all the Gear I had made for myself (bike shorts and more) SaddleBags, Handlebar Bags, A Stuffed Dog to match that was actually a Gear Bag that sat on top of my Saddlebags backwards. I still have all the gear, but it is in storage in N WI, we now live in NW SD. Not sure when we will be able to get all that stuff here.
Take photos with both the old style, hold them in your hand pictures, and take photos that are digital. I promise you that years from now, you will want to look at them and show them off!
And Then, You Will Make Another! As soon as you set your Brand New Frame Bag on your Bicycle and look at it for the first time.....you are going to think..... "I should have...."
Keep in mind, when you set your Frame Bag into your Bicycle Frame, it is going to look 'odd' to you. Remember that when full of items it will look different on the Bicycle than when it is empty.
When I sew, I am so critical of what I make. I honestly have learned to take the items I make, put them away, where I do not look at them for at least a day, usually three days, then look again. Not so bad.
When you first finish a project, THIS is when you are the most critical. THIS is when you notice every single stitch within. After a couple of days you will not look so danged close at the item and see it for the beauty it is. You will see it more like others look at it.
Then there is the 10' Rule. Every heard of this? This is a term used in Theater. When Costumes are made they are usually made on a budget and fast. They are not seen up close by the audience and most audiences are not looking at small areas of the Costume. It was discovered many many years ago, that if something looks good 10' away, it looks good to 'others'.
The contents of this page for Bicycle Frame Bags ~ Make Your Own is still under construction. Please check back later!
Please join us in the Yahoo! groups discussion for Does My Butt Look Big In The Saddle.
-- The Far Out Living Team
Wed, 08 Oct 2014 10:16:03 -0400
| 


 In the high plains of South Dakota, USA